
How to Build Your First Model Rocket: A Beginner's Guide
Building a model rocket is a fun way to learn about physics, engineering, and problem-solving. This guide walks you through the basics of assembly, safety rules in the UK, and tips for a successful launch. Here's what you'll need to know:
- Key Components: Body tube, nose cone, fins, motor mount, recovery system (parachute/streamer), and igniter.
- Tools & Materials: Hobby knife, sandpaper, wood glue, plastic cement, and a beginner-friendly rocket kit like the Sky Piercer Starter Set (£84.95) or Star Chaser Kit (£13.95).
- UK Safety Rules: No licence needed for small motors (A–D class), but you must be 16+ to buy them. Launch in open areas, follow UKROC guidelines, and avoid airports or restricted zones.
- Step-by-Step Assembly: Secure the engine mount, attach fins, pack the recovery system, and double-check all parts before launch.
- Launch Day Prep: Choose a clear, open field, inspect the rocket, and follow safety checks before ignition.
Model rocketry is accessible and safe when you follow the rules. Start with a simple kit, and as you gain confidence, you can explore more advanced designs and motors. Let’s get started!
What Tools do You Need for Building Skill Level 1 Model Rockets?
Model Rocket Basics
Understanding the basics of model rocketry can make your first build less daunting and much more enjoyable. Once you grasp these essentials, you'll see how each part contributes to a safe and successful flight.
How Model Rockets Work
Model rockets rely on the principle of thrust to take flight. When the motor burns its fuel, it expels gases downward, creating an upward force in line with Newton's Third Law. Once the fuel is spent, the recovery system kicks in, ensuring the rocket returns to the ground safely.
Main Parts of a Model Rocket
A typical model rocket is made up of several key components, each playing a critical role:
- Body Tube: The central structure that holds everything together.
- Nose Cone: Located at the top, it helps the rocket cut through the air by reducing drag.
- Fins: Situated at the base, these stabilise the rocket during flight.
- Motor Mount: Keeps the engine securely in place.
- Recovery System: Often a parachute or streamer, this deploys to slow the rocket's descent.
- Igniter: A small device that starts the motor's combustion at launch.
Each of these parts works together to ensure the rocket performs as expected and remains stable throughout its flight.
Now that we've covered the components, let's look at the safety measures and UK-specific regulations that govern model rocketry.
Safety Rules and UK Regulations
In the UK, model rocketry is regulated to ensure safety for both enthusiasts and the public. The UK Rocketry Organisation (UKROC) provides detailed guidance on safe practices, which you should review before starting your build.
While no licence is required to purchase or use model rocket motors in the UK, buyers must be at least 16 years old. Motors are classified by their total impulse, and beginners are encouraged to use low-power motors suited for smaller launch sites.
When assembling your rocket, always work in a well-ventilated area, away from open flames. Follow the manufacturer's instructions carefully when using adhesives, paints, or other materials. Never attempt to modify motors or create your own propellant - this is not only dangerous but also illegal.
For launches, ensure bystanders are kept at a safe distance, and perform a clear countdown before ignition. Select a launch site that is open and free from obstacles like trees, power lines, or buildings. If you're using private land, make sure you have the landowner's permission.
Store rocket motors in a cool, dry place, out of direct sunlight. Always check expiry dates before use to guarantee safe and reliable performance.
With these fundamentals in mind, you're ready to start building your model rocket and experience the thrill of a safe and successful launch.
Tools, Materials, and Supplies You'll Need
Having the right tools and materials on hand before you begin can save you both time and unnecessary hassle when building your model rocket.
Essential Tools and Materials
You don’t need a high-tech workshop to build your first rocket. A few basic tools and supplies will do the trick.
Start with a sharp hobby knife for cleanly trimming parts, fine-grit sandpaper (220–400 grit) for smoothing edges, and a steel ruler or measuring tape for precise measurements. A pencil is handy for marking cut lines, while a cutting mat protects your work surface. For gluing components, a small paintbrush ensures accurate adhesive application.
When it comes to adhesives, wood glue is a go-to for attaching fins to the body tube, while plastic cement works well for securing plastic nose cones. If you’re looking for quick bonds, cyanoacrylate (CA glue) - commonly known as superglue - can be useful, but handle it carefully as it bonds skin instantly.
The materials you’ll need depend on your rocket kit. Most beginner kits include balsa wood for fins, lightweight cardboard or plastic for the body tube, and moulded plastic for the nose cone. The recovery system - usually a parachute or streamer - is often pre-made and crafted from thin plastic or ripstop nylon. An elastic shock cord connects the recovery system to the rocket body.
If you want to customise your rocket, consider adding primer to help paint stick, acrylic or enamel paints for a polished finish, and masking tape to create crisp lines between colours.
Choosing Your First Rocket Kit
Selecting the right kit can make all the difference when you’re just getting started. Beginner-friendly kits are designed with pre-cut parts and clear instructions, so you can focus on learning assembly techniques without unnecessary complications.
For an all-in-one option, consider the Sky Piercer Starter Set from Rocketry for Schools, priced at £84.95. It includes motors compatible with A–C classes and all the components you’ll need. If you’re looking for something more hands-on and budget-friendly, the Star Chaser Model Rocket Kit is available for £13.95 and offers a build-it-yourself experience, helping you understand how each piece works together. For group projects, the 5x Star Chaser Team Class Pack at £39.95 is a cost-effective choice, providing five kits - perfect for families or small clubs.
When browsing kits, check for ones that specify the skill level required. Beginner kits should feature fewer parts, straightforward assembly, and low-power motors to keep things manageable.
Once you’ve chosen your kit, the next step is finding a reliable UK supplier to purchase your materials.
Where to Buy Supplies in the UK
If you’re in the UK, there are several trusted suppliers specialising in model rocketry, making it easy to find what you need.
Rocketry for Schools (rocketryforschools.co.uk) is a top choice, offering a wide range of model rocket kits and building supplies. They cater to educational settings but also welcome individual enthusiasts. Their inventory includes everything from complete starter sets to individual components like motors, launch pads, igniter controllers, and adhesives. They even stock electronics for more advanced payload projects if you decide to expand your skills later.
With these tools, materials, and suppliers, you’ll be ready to dive into your first model rocket build.
sbb-itb-f093e97
Building Your Model Rocket: Step-by-Step Instructions
Breaking the process into manageable steps makes assembling your model rocket much easier.
Putting the Rocket Together
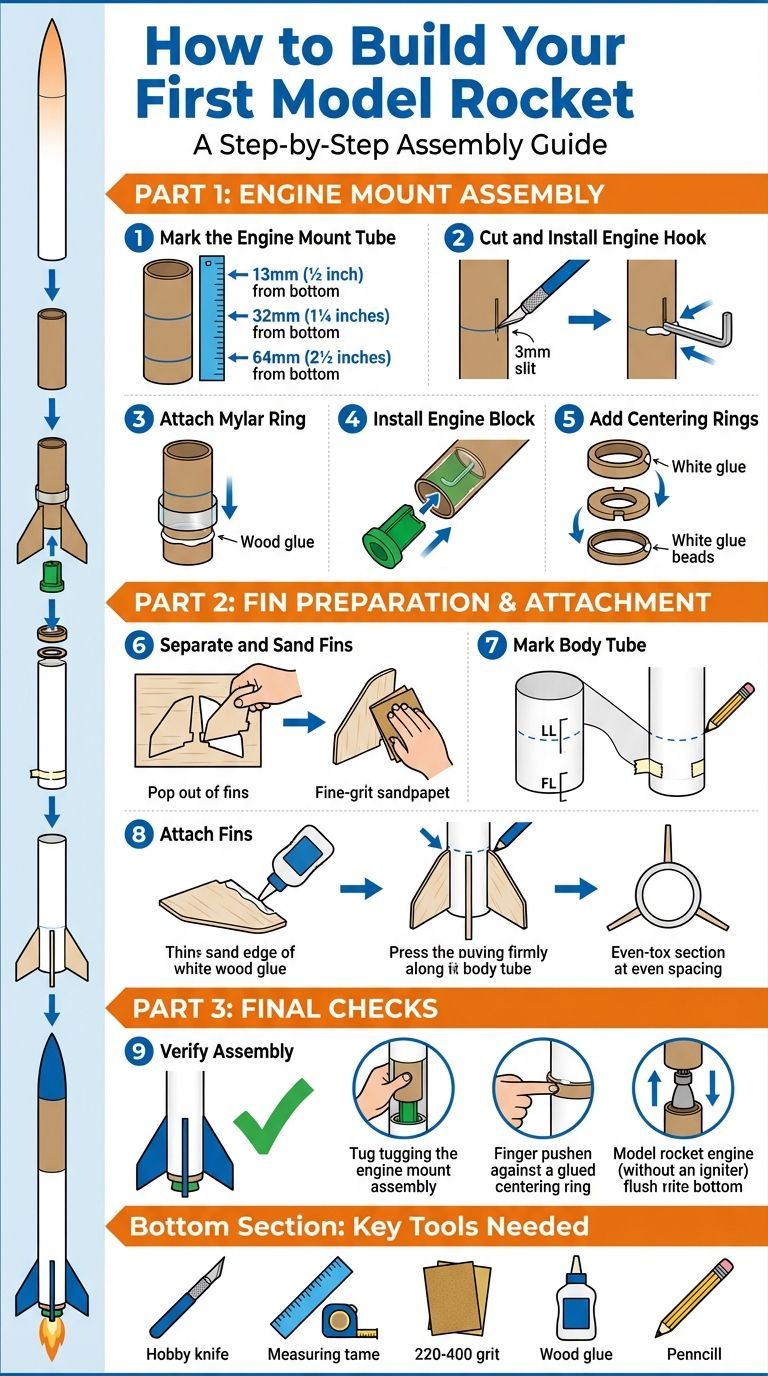
Assembling the engine mount
- Take the engine mount tube and use a ruler to mark three lines: one at 13 mm from the bottom, another at 32 mm, and a third at 64 mm. These measurements correspond to ½ inch, 1¼ inches, and 2½ inches respectively.
- At the 64 mm mark, carefully cut a 3 mm slit into the tube using a modelling knife. Make several light passes to ensure precision.
- Insert the right-angle end of the engine hook into the slit, then lay the hook flat against the tube. Secure it with a thin line of glue.
- Apply wood glue at the 32 mm mark and slide the Mylar ring down the engine mount until it rests on the glue line.
- Add glue inside the engine mount tube, opposite the engine hook, and insert the green engine block. This will keep the motor from shifting during flight.
- Cut out the centring rings from the perforated sheet included in your kit. Slide them over the engine mount tube: position the notched ring at the 13 mm (½ inch) line and the unnotched ring at the top of the tube. Secure both with glue.
Once the engine mount and centring rings are in place, you can move on to preparing and attaching the fins.
Preparing and attaching the fins
- Gently separate the fins from the laser-cut balsa sheet, being careful not to splinter the wood.
- Use fine-grit sandpaper to smooth any rough edges. Align all the fins together and sand their base edges to ensure a clean, even attachment to the rocket’s body.
- To position the fins accurately, cut out the tube marking guide from your instruction manual. Tape the end marked "LL" (launch lug) to the bottom of the body tube, wrap the guide around the tube, and secure the "FL" (fin line) side. Use a pencil to mark the "FL" and "LL" lines on the tube. These marks will guide where each fin and the launch lug should be attached.
- Apply a thin bead of wood glue along the root edge of a fin. Press the fin firmly against the body tube, aligning it with one of your pencil marks. Repeat this process for the remaining fins, ensuring they are spaced evenly for balance.
Checking Your Work and Making Adjustments
Once assembly is done, take a moment to ensure everything is secure and properly aligned before moving on to launch preparations.
- Confirm that the engine mount is solidly in place and that the centring rings are firmly glued.
- Perform a test fit by sliding an engine (without an igniter) into the mount. It should fit snugly, held securely by the engine hook, and sit either flush or slightly recessed from the rocket’s bottom.
If everything checks out, your rocket is structurally ready for the next stage: preparing for launch day!
Getting Ready for Launch Day
With your rocket fully assembled and structurally sound, the final steps are all about ensuring a smooth and safe first flight. This phase focuses on protecting your rocket during descent, picking the right launch spot, and carrying out essential safety checks before ignition.
Installing the Recovery System
A recovery system is what brings your rocket safely back to the ground, preventing damage and making it reusable. For beginner rockets using D-class motors or smaller, the process is fairly straightforward, as the motor’s ejection charge automatically handles deployment.
Key components to know
Your recovery system consists of several essential parts: a parachute (or a streamer for smaller rockets), a shock cord that connects the parachute to the rocket body, and recovery wadding - fireproof material that shields the parachute from the motor’s hot gases. Before heading to the launch site, make sure you have enough wadding, as fresh sheets are needed for every launch.
Packing the parachute
Start by laying the parachute flat and ensuring its shroud lines aren’t tangled. Fold it loosely to allow proper deployment. The shock cord should already be attached to both the nose cone and the body tube, as per your kit’s instructions. Next, take three to four sheets of recovery wadding (or the amount specified in your kit) and roll them into a loose cylinder that fits comfortably inside the body tube.
Insert the wadding first, followed by the folded parachute and the shock cord. Finish by placing the nose cone on top. The nose cone should fit snugly but not so tightly that the ejection charge can’t push it off. The wadding acts as a heat barrier, protecting the parachute from burn damage.
How the ejection process works
When the rocket reaches its highest point (apogee), the motor’s ejection charge pushes the nose cone off and deploys the parachute. For rockets using motors up to G-class, this built-in ejection system is reliable and doesn’t require additional electronics. Your main responsibility is to pack everything correctly so the system operates as intended.
Choosing a Launch Site
Once your rocket and recovery system are ready, the next step is finding a suitable and safe launch location. In the UK, this means an open area with good weather and adherence to local rules.
How much space do you need?
Choose a large, flat field with no obstructions. For a beginner rocket powered by a D-class motor, aim for a site with at least 150 metres of clear space in all directions. Avoid launching near buildings, roads, power lines, airports, or livestock. Even a small rocket can drift far if caught by the wind, so having extra space is crucial.
Public parks might seem convenient, but always check with your local council first, as some prohibit rocket launches. Private farmland (with the owner’s permission) can work well, as can designated flying fields maintained by aeromodelling clubs. Some UK rocketry clubs also host launches at established sites with proper safety measures in place.
Weather matters
Launch only in calm weather. Wind speeds over 15 km/h can throw your rocket off course or cause it to drift far during descent. Steer clear of launching in rain, fog, or when storm clouds are nearby. Check the weather forecast the evening before and again on launch day. If conditions are less than ideal, it’s better to wait - there’s always another day to fly.
Know the rules
In the UK, you don’t need special permits for small model rockets using motors up to D-class, but you must follow general safety guidelines. Never launch near airports or within controlled airspace. The Civil Aviation Authority (CAA) recommends staying at least 5 kilometres from airport boundaries. If you’re unsure about restrictions in your area, consult the CAA’s guidance on drones and model aircraft, which also applies to rockets. Following these rules ensures a safer and more enjoyable launch experience.
Pre-Launch Safety Checks
After choosing your launch site, work through a series of checks to confirm your rocket is ready for flight. Take your time - don’t rush this step. These checks verify that every part of your rocket, from the engine to the fins, is secure and functioning correctly.
Inspect the structure
Carefully examine all glue joints, testing the fins and centring rings to ensure they’re firmly attached. Look for cracks or damage on the body tube and nose cone.
Install the engine
Insert the motor into the engine mount, making sure the engine hook clicks securely into place. The motor should sit flush with or slightly recessed from the bottom of the rocket. Double-check that you’re using the correct motor for your rocket, as specified in your kit.
Prepare the igniter
Insert the igniter into the motor’s nozzle, following the manufacturer’s instructions. The igniter wires should extend out from the motor, ready for connection to the launch controller. If your motor uses an igniter clip, gently bend it to hold the igniter in place. Never connect the igniter to the launch controller until everyone is safely behind the safety line at the launch pad.
Final wadding and parachute check
Just before heading to the launch pad, insert fresh recovery wadding, followed by your parachute and shock cord. Fit the nose cone securely. Give the rocket a gentle shake to make sure the parachute can move freely.
Set up the launch pad
Position the launch pad on level ground with the rod standing vertically. Keep the pad at least 5 metres away from flammable materials. Connect your launch controller but leave the safety key out until you’re ready to launch. Create a safety perimeter of at least 5 metres around the pad, with all spectators standing behind the controller.
Run through a final verbal checklist: motor installed, igniter connected, parachute packed, area clear, and wind conditions acceptable. Once everything checks out, insert the safety key and begin your countdown.
Conclusion
Completing your first model rocket build and launch is no small feat. It’s a journey that rewards you with hands-on skills and the sheer excitement of seeing your creation take flight. Along the way, you’ve learnt how to pick the right kit, assemble each part with care, and stick to essential safety measures - everything from understanding UK regulations to performing meticulous pre-launch inspections. Each task, whether attaching fins or packing a parachute, plays a role in ensuring a successful flight while also sharpening your engineering abilities.
Safety remains the cornerstone of every launch. Sticking to proper safety practices and conducting thorough checks not only protects you and those around you but also ensures your rocket is ready to soar again.
Want to take things a step further? Try experimenting with different motor types to see how they affect altitude and speed. Keeping a launch journal is another great way to track variables like weather, engine performance, and flight results. Over time, these records can reveal patterns and help you fine-tune your skills.
For those looking to push the boundaries, building custom rockets from the ground up offers a deeper dive into engineering. You might even venture into mid-power rocketry, using E, F, or G-range motors to reach impressive altitudes or carry payloads such as cameras or altimeters. Some enthusiasts take on ambitious projects like crafting scale models of real spacecraft - think Saturn 5 or the Space Shuttle - or experimenting with multi-staging techniques, where engines ignite in sequence to achieve remarkable heights. Just remember, every advanced project starts with the same unwavering focus on safety and precision.
Connecting with local rocketry clubs or attending launch events can provide valuable insights and resources. Foundational guides like G. Harry Stine’s Handbook of Model Rocketry are excellent for expanding your knowledge and tackling more complex projects.
Each successful launch builds your confidence and opens doors to even more exciting experiments. Keep testing new ideas, stay eager to learn, and most importantly - enjoy every moment of the adventure.
FAQs
What are common mistakes beginners make when building their first model rocket, and how can they be avoided?
Building your first model rocket is an exciting experience, but beginners often stumble on a few common mistakes. The good news? With a little preparation and attention to detail, these missteps are easy to avoid.
One of the biggest pitfalls is rushing through the process. Take your time - read the instructions carefully and make sure you fully understand each step before diving in. Another common mistake is skipping steps or cutting corners. Every part of the assembly has a purpose, so don’t overlook components that seem unimportant or skip steps to save time. Trust the process; it’s there for a reason.
Safety is another area where beginners sometimes slip up. Always stick to the safety guidelines: use the right tools, work in a safe space, and choose motors that are appropriate for your rocket. And here’s a tip - keep things simple. Beginner kits are designed to be straightforward, so resist the urge to modify or upgrade parts unnecessarily. Focus on mastering the basics first.
By staying patient, organised, and mindful of safety, you'll be well on your way to a smooth and successful launch!
What is the safest way to store model rocket motors and materials when not in use?
To ensure your model rocket motors are stored safely, keep them in their original packaging and place them in a designated non-metal container. A wooden or plastic box works well for small black powder motors. Make sure the storage space is cool, dry, and well-ventilated, keeping it away from direct sunlight or any heat sources. Always adhere to local safety regulations to minimise risks.
What can I do if my model rocket fails to launch or encounters problems during flight?
If your model rocket fails to launch or encounters issues during flight, start by examining the assembly. Make sure all parts are properly put together and securely fastened. Check that the engine is installed correctly, the igniter is positioned as it should be, and all connections in the launch system are tight and secure.
Take a moment to assess the weather conditions as well. Strong winds or wet weather can interfere with your rocket's performance and safety. Ideally, launch on a calm, clear day with little to no wind for the best experience.
If problems continue, carefully inspect the rocket for any signs of damage or wear. Double-check that you’re using the correct engine type specified for your model. Always refer to the instructions included in your rocket kit for guidance on troubleshooting and ensuring safe operation.
Related Blog Posts
- Ultimate Guide to Classroom Rocketry Projects
- Best Adhesives for Model Rocket Construction
- Wind Speed Limits for Rocket Launches
- Common Glue Mistakes in Rocket Assembly