
Common Glue Mistakes in Rocket Assembly
When building model rocket kits, adhesive mistakes can lead to failure during flight. Here are the most frequent errors and how to avoid them:
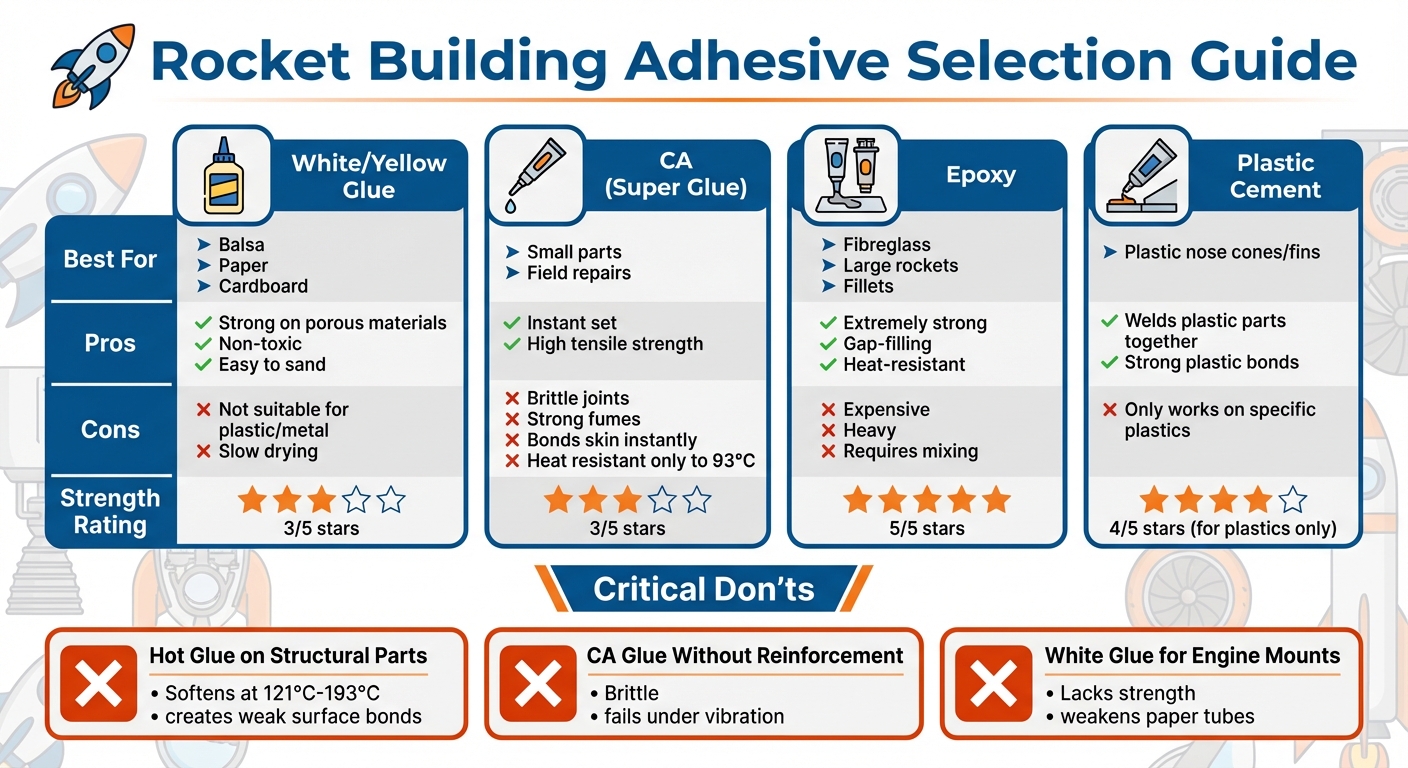
- Hot Glue on Structural Parts: Hot glue softens under heat (121°C–193°C) and creates weak bonds. Use it only for non-structural tasks like securing wires.
- Cyanoacrylate (CA) Glue Without Reinforcement: CA glue is brittle and fails under vibrations or heat. Use it for temporary bonds, then reinforce with wood glue or epoxy.
- White Glue for Engine Mounts: White glue lacks the strength for motor mounts. Opt for yellow wood glue or epoxy instead.
Key Tips:
- Surface Prep: Sand and clean surfaces before gluing for better adhesion.
- Fillets: Add fillets to strengthen fin-body joints and reduce drag.
- Glue Amount: Apply enough glue for a strong bond but avoid excess weight.
Mistakes can be fixed by removing excess glue (use solvents or sandpaper), reinforcing weak joints with proper adhesives, or reattaching misaligned parts carefully. Proper adhesive selection and application ensure your rocket stays strong and stable during launch.
Adhesive & Glue for Rocket Building
sbb-itb-f093e97
Common Glue Mistakes in Rocket Assembly
Even seasoned rocket builders can slip up when it comes to adhesives, and these mistakes can seriously affect how a rocket performs. Knowing what to avoid is key to assembling rockets that are both strong and reliable. Here are three frequent errors where convenience is often prioritised over durability, sometimes with disastrous results during flight.
Using Hot Glue on Load-Bearing Parts
Hot glue might be handy, but it’s a poor choice for structural components in rockets. It softens at temperatures between 121°C and 193°C, which is well within the heat range generated by rocket motors during flight. Unlike wood glue, which seeps into material fibres to create a strong bond, hot glue merely sits on the surface. This results in a weak connection that can fail unexpectedly under stress. It also sets too quickly, making it difficult to shape proper fillets, and working with it carries a risk of burns. Hot glue should only be used for non-structural tasks, like sealing cable penetrations in bulkheads or securing wires in avionics bays.
Applying Cyanoacrylate (CA) Glue Without Reinforcement
CA glue is known for bonding instantly, but its joints can be brittle and prone to failure under the vibrations of flight or the impact of a hard landing. Most standard CA glues are only heat-resistant up to 93°C, which may not be sufficient for areas near motor mounts. A better approach is to use a small drop of CA glue to tack fins in place temporarily, followed by a structural fillet of wood glue or epoxy to create a durable bond. For critical parts, consider using rubber-toughened CA glue, which adds flexibility and improves resistance to impact. This method ensures your joints can handle the stresses of flight.
Using White Glue for Engine Mounts
White glue might seem like a convenient option, but it doesn’t have the strength required for motor mounts. Its moisture content can also weaken paper body tubes. Engine mounts experience intense forces during liftoff and ejection, where gases attempt to push the motor out. Instead, opt for yellow aliphatic resin glue, such as Titebond II, or 5-minute epoxy. Both are stronger than the paper tubes and centring rings they secure. When installing motor mounts, work in a single, continuous motion. Pausing can cause the glue to set prematurely, leaving the mount misaligned. Using the right adhesive here is crucial for ensuring your rocket holds up under pressure.
Surface Preparation for Better Adhesion
Creating strong adhesive bonds starts with careful surface preparation. This step is essential for ensuring the structural reliability of components during flight. In fact, inadequate surface preparation is often the leading cause of bond failure. Even the most robust epoxy won’t perform if it’s adhering to dust, grease, or release agents instead of the actual material.
Sanding Model Rocket Tubing and Components
Sanding plays a crucial role in removing contaminants like oxides, paint, and residue that can interfere with adhesion. Using fine-grit sandpaper (120–240 grit) is recommended, as it creates the right surface texture without damaging the material. Fine sanding helps reduce surface tension, allowing the adhesive to spread more effectively.
"We are actually exciting the hydrogen groups and leaving openings for our epoxy to fill, creating a bond on an atomic level." - flynfrog, Composite Aerospace Professional
However, sanding should never be the first step if the surface still has oils or release agents. Clean the surface thoroughly first, then sand, and clean again afterwards. For best results, apply the adhesive within an hour of sanding, as the surface remains in an activated state during this time. After sanding, ensure all residual dust is removed before applying the adhesive.
Cleaning Surfaces Before Gluing
After sanding, cleaning is a critical step to remove loosened particles and any remaining oils. Use a lint-free cloth and an appropriate solvent - like isopropyl alcohol (IPA) for most materials or acetone for aluminium - to wipe the surface in a consistent motion. This ensures contaminants are effectively cleared away.
To confirm the surface is clean, try the Water Break Test. Add a small drop of water to the prepared area. If it spreads into a continuous film, the surface is clean and ready for bonding. If the water beads up, hydrophobic contaminants such as oils are still present, and further cleaning is required. Always wear clean gloves during this process to avoid transferring oils back onto the surface.
Proper surface preparation is the cornerstone of strong adhesive bonds, ensuring a solid and durable rocket structure.
Best Practices for Glue Application
Rocket Building Adhesive Comparison Guide: Best Glue Types for Each Component
When it comes to building rockets, how you apply adhesive is just as important as preparing the surfaces. The way you handle glue can make or break your rocket's structural integrity. There are three key practices to keep in mind: creating proper fillets, choosing the right adhesive for each component, and applying the correct amount of glue. Let’s dive into these steps to ensure every application strengthens your rocket.
Using Fillets to Strengthen Fin-Body Joints
Fillets play a dual role in rocket building. They not only enhance the bonding area to handle aerodynamic and landing stresses but also reduce interference drag. This drag occurs when air becomes turbulent around sharp corners, potentially accounting for 5% to 10% of a rocket's total resistance. Smoother airflow around the fin-body joint means better performance.
"The fillet adds strength to the fin/body connection, making it harder for the fin to pop off the tube after a hard landing. Typically, the wider the fillet, the more strength it adds." - Tim Van Milligan, President, Apogee Components
For optimal results, aim for a fillet radius between 4% and 8% of the fin's root chord. The type of adhesive also matters. For paper or wood joints, wood glue works best as it penetrates the material's pores, forming a bond three times stronger than epoxy. On the other hand, epoxy is the go-to choice for high-power or fibreglass rockets.
To achieve clean, professional-looking fillets, use masking tape to mark the edges on both the fin and the body tube. After applying the adhesive, smooth it out with a dowel rod or popsicle stick to create a uniform curve. Remove the tape while the glue is still wet for crisp edges. The fillet should seamlessly blend into the airframe, with its height on the fin matching its extension onto the body tube.
Choosing the Right Adhesive for Each Part
Now that you’ve got strong fillets, selecting the right adhesive for each material is just as crucial. Different materials require different adhesives for a reliable bond. For porous materials like balsa and paper, wood or white glue works best. Nonporous materials, such as plastic, need plastic cement or specialised CA glues.
Yellow wood glue, also known as aliphatic resin, is often the top choice for most rocket applications. It dries faster than white glue, forms a more rigid bond, and is easier to sand for a smoother finish.
Here’s a quick comparison of adhesive types:
| Adhesive Type | Best For | Pros | Cons |
|---|---|---|---|
| White/Yellow Glue | Balsa, Paper, Cardboard | Strong on porous materials, non-toxic | Not suitable for plastic/metal, slow drying |
| CA (Super Glue) | Small parts, Field repairs | Instant set, high tensile strength | Brittle, strong fumes, bonds skin instantly |
| Epoxy | Fibreglass, Large rockets, Fillets | Extremely strong, gap-filling, heat-resistant | Expensive, heavy, requires mixing |
| Plastic Cement | Plastic nose cones/fins | Welds plastic parts together | Only works on specific plastics |
For quick assembly, you can use a drop of CA glue to temporarily hold fins in place. Then, reinforce the bond with wood glue or epoxy fillets for long-term strength.
Applying the Correct Amount of Glue
Getting the glue amount just right is a balancing act. Too much adhesive can add unnecessary weight, shifting the Centre of Gravity and risking instability. On the flip side, too little glue can weaken the bond.
The key is to focus on creating a wide bonding surface rather than layering on thick glue. Tools like rounded popsicle sticks or dowel rods can help you smooth out fillets and remove any excess adhesive. The goal is to blend the glue into the body tube and fin, ensuring a strong bond without adding extra mass. A thin, even layer is usually all you need.
For parts that slide together, such as couplers, avoid overapplying glue. Excess adhesive can cause the parts to seize before they’re fully seated. A light, even coat will spread naturally as you press the components together. Less is often more when it comes to glue application.
How to Fix Adhesive Mistakes
Even the most experienced rocket builders occasionally make mistakes with adhesives. Whether you are just learning model rocketry basics or building advanced kits, errors are part of the process. The good news? Most of these errors can be fixed without compromising the rocket's structural integrity. The key is understanding the right removal method for each adhesive type and knowing when to reinforce or reattach components. Let’s dive into how to handle adhesive mishaps effectively.
Removing Excess or Misapplied Glue
The approach to removing unwanted glue depends on the adhesive type and whether it has cured. For water-based glues, simply wipe them off with a damp cloth while they’re still wet. If you’re dealing with hardened cyanoacrylate (CA) glue, soften it using nitromethane or an adhesive remover. Rubbing alcohol can also help on non-porous surfaces.
Epoxy, however, is a different story. Once epoxy has cured, chemical solvents like acetone won’t work. As Bobby Potter and Tim Van Milligan from Apogee Components explain:
Once epoxy has hardened, acetone and other thinners aren't going to make an impact. Sandpaper is the obvious choice... but for localized epoxy in unwanted locations... we recommend metal files.
Metal files are particularly useful for targeting small areas of epoxy without damaging the surrounding surface, such as the body tube finish.
To prevent excess adhesive buildup during application, try smoothing wet epoxy clay fillets with a finger dipped in alcohol. For CA glue, use a polyethylene bag over your finger to smooth the bead without risking it bonding to your skin. Avoid using sharp tools like razors or knives to scrape glue, as they can damage the rocket’s surface and pose a safety risk.
Once the excess glue is dealt with, you can focus on strengthening any weak joints.
Reinforcing Weak or Brittle Joints
Weak adhesive joints can often be saved with reinforcements. Adding a proper fillet - especially where fins meet the body - can significantly increase the bonding surface area. For high-power rockets, internal fillets located inside the body tube (where the fin tab meets the motor mount) provide much greater strength than external fillets alone.
Before applying reinforcements, prepare the surface properly. Scuff the area with 60-grit sandpaper and clean it with rubbing alcohol to ensure the adhesive bonds effectively. For porous materials, wood glue can create a strong bond, but epoxy is the preferred choice for fibreglass-to-fibreglass connections in high-power rockets.
Epoxy clay is a great option for clean reinforcements. Roll it into a thin strip, press it into the joint, and smooth it with a finger dipped in alcohol. If a misaligned CA joint needs to be removed first, use a CA debonder like "Un-Cure." Apply the debonder, wait about a minute, and then carefully separate the parts.
Replacing Detached or Misaligned Components
If a component has detached or been misaligned, reattachment requires precision. Start by clearing any hardened adhesive from the area. For epoxy, use metal files to remove residue without damaging the surrounding material. As with all adhesive work, cleanliness is crucial. Wipe the attachment point with a lint-free rag dipped in isopropanol to remove dirt or grease before reapplying glue.
For perfect alignment, use tools like a fin jig or a dowel rod to create alignment guides before applying adhesive. Begin by tacking the component in place with a small drop of thick CA glue. Once you’re confident it’s correctly aligned, apply permanent structural fillets using either wood glue or epoxy.
If the detached part has left a gap or uneven surface, mix epoxy with microballoons or wood flour to fill the void. This not only provides structural support but also creates a surface that’s easy to sand.
Conclusion
Applying adhesives correctly is a key factor in ensuring your rocket performs reliably. It's all about choosing the right adhesive for the materials you're working with, preparing surfaces by sanding and cleaning, and adding fillets where the fins meet the body tube, as outlined earlier. These steps form the foundation for creating strong, dependable bonds throughout your rocket.
Tim Van Milligan, President of Apogee Components, highlights this perfectly:
The character of your fillets is a tell-tale sign as to the overall quality and the effort you put into the construction of your rocket.
Mistakes with adhesives can happen, but they’re not the end of the world. If cyanoacrylate is misapplied, a CA debonder can help remove it. Once removed, ensure you sand and clean the area thoroughly before reinforcing the joint. Catching and fixing these issues well in advance of launch day is essential for a successful flight.
Building rockets takes patience and attention to detail. Whether you're assembling your first model or you're a seasoned builder, the process remains the same: pick the right adhesive, prepare your surfaces carefully, and apply it with precision. With high-quality materials from Rocketry for Schools, you can confidently construct rockets that are both safe and reliable.
FAQs
Why is it important to prepare surfaces before gluing during rocket assembly?
Before applying glue, getting the surfaces ready is absolutely crucial for creating a strong, lasting bond. This process clears away contaminants like dust and grease, opens up tiny pores in the material, and gets rid of air pockets that might compromise the adhesive's grip. By properly preparing the surfaces, you give the glue the best chance to adhere fully, resulting in a joint that can handle the demands of launch and flight.
To do this right, start by thoroughly cleaning the surfaces to remove any debris or grease. If necessary, lightly sand them to improve adhesion, and make sure they’re completely dry before applying the adhesive. These simple steps can make all the difference in building a rocket that’s both reliable and safe.
Why should I use fillets on the joints between the fins and the rocket body?
Adding fillets to the joints where the fins meet the rocket body not only strengthens the connection but also makes it more resilient under the stresses of flight. On top of that, fillets help create a smoother surface, which reduces drag and boosts the rocket's aerodynamic performance.
What’s great is that fillets are straightforward to shape. You can fine-tune them with sanding, filing, or drilling to get the exact fit you need. Plus, they give you plenty of working time during application, making them a practical choice for improving your rocket's durability and overall lifespan.
What should I do if I make a mistake with the adhesive while assembling my rocket?
If you've made an error with the adhesive while assembling your rocket, don't stress - it can be sorted out! Begin by gently removing any extra or misplaced glue. Once the area is cleared, lightly sand the joint to smooth it out. After that, apply a thin, even layer of the proper adhesive for the materials you're working with: use carpenter's glue for balsa wood or plastic cement for plastic components. Press the parts together firmly for about 10 seconds to ensure they bond properly.
If you notice small gaps after reassembling, a thinned filler, like lightweight wood filler, works well to close them up. Let everything cure completely before moving on to the next stages of your build. Taking the time to get this step right will give your rocket a sturdy and dependable structure!