
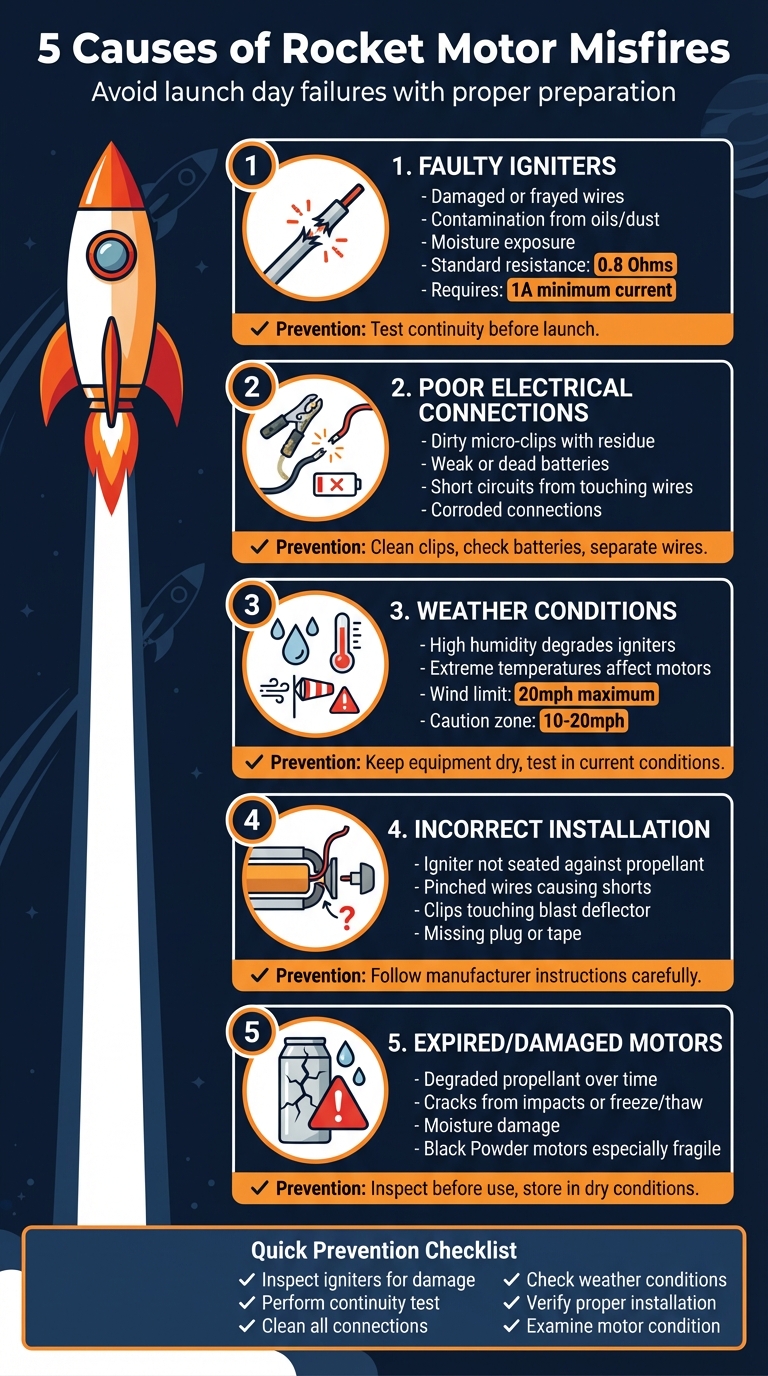
5 Causes of Rocket Motor Misfires
When a rocket motor fails to ignite, it can ruin your launch day and create safety risks. Misfires often result from issues with the igniter, electrical connections, motor installation, weather conditions, or the motor itself. The good news? These problems are avoidable with proper preparation and checks. Here's a quick breakdown:
- Faulty Igniters: Damaged wires, contamination, or moisture can stop the igniter from working. Always test continuity and handle igniters carefully.
- Poor Electrical Connections: Dirty clips, weak batteries, or short circuits can interrupt the circuit. Clean clips, check batteries, and ensure wires are properly separated.
- Weather Conditions: High humidity or extreme temperatures can affect igniters and motors. Keep equipment dry and stable.
- Incorrect Motor Installation: Misaligned igniters or pinched wires can cause failures. Secure the igniter properly and follow instructions.
- Expired or Damaged Motors: Old or physically damaged motors can degrade and fail. Inspect motors for cracks or dampness before use.
5 Common Causes of Rocket Motor Misfires and Prevention Tips
1. Faulty or Damaged Igniters
When it comes to misfires, a faulty igniter is often the main culprit - and surprisingly, it's something many overlook during final checks.
The igniter plays a crucial role in kickstarting every successful launch. Physical damage, like bent or frayed wires, can disrupt electrical contact, while contaminants such as skin oils, dust, or grease on the conductive ends create resistance that blocks the current required for ignition. Even small issues like these can bring your launch to a standstill.
Humidity is another enemy of igniters. Moisture exposure can degrade the pyrotechnic compound, making the igniter unreliable or entirely non-functional. Short circuits are also a common problem, often caused when wires touch during installation - especially when inserting the igniter into the engine nozzle with a plug. The UK Rocketry Association offers this reminder:
"Take care not to split and break the tip or prematurely short the leads when inserting the plug".
Continuity testing is a must. Standard electric igniters generally have a resistance of about 0.8 Ohms and need at least 1A of current to work properly. Before launching, insert the safety key into your controller and check for an indicator light or beep. If there's no signal, it means the circuit isn't complete - likely due to an internal break or a poor connection within the igniter.
To keep igniters in working condition, store them in a cool, dry, airtight container to shield them from environmental damage. Always handle them with clean, dry hands or gloves to avoid transferring oils, and inspect each one for visible damage. Straighten any bent wires carefully and confirm the pyrogen tip is intact. Additionally, clean the micro-clips on your launch controller with fine sandpaper or steel wool to remove any leftover exhaust residue.
If an igniter burns but the motor fails to ignite, the problem usually lies in improper seating, not the igniter itself. The pyrogen tip must make direct contact with the propellant. Ensure the igniter is fully inserted into the motor and secured with a plug or tape to prevent movement during setup.
Next, we’ll dive into another key issue behind misfires: poor electrical connections.
2. Poor Electrical Connections
Once you've confirmed your igniter is in perfect working order, it's time to check that every electrical connection in the circuit is secure.
A rocket motor won't ignite if the electrical pathway is disrupted. Fortunately, poor connections are often easy to address.
One common trouble spot is the micro-clips that hold the igniter leads. Over time, these clips can accumulate exhaust residue, soot, or corrosion, which increases resistance and prevents the igniter from heating properly. As Charlie, the founder of The Model Rocket, explains:
"If your igniter is still unburned after the failed launch attempt... it never received the electricity needed to ignite. This could be an issue with the electricity in the launch controller itself, or the connection either within the launch controller or the connection to the igniter."
Short circuits are another potential problem. If bare wires touch each other or come into contact with a conductive surface, the current bypasses the igniter tip entirely. Bobby Potter and Tim Van Milligan from Apogee Rockets highlight this issue:
"It's important to keep the two lead wires separated, otherwise the current will pass through wherever the two wires touch and never pass through the nichrome at the tip. This will always result in a misfire."
For bare-wire igniters, using the provided tape or paper separator to keep the leads apart is a simple but crucial step.
Additionally, a dim continuity light or a weak beep from your launch controller might signal that the batteries are running low. Always check that your batteries are fresh and, if needed, opt for alkaline types to ensure sufficient voltage. Don't forget to inspect the safety key - make sure it's clean and fully inserted to complete the circuit.
3. Environmental Factors (Temperature and Humidity)
Weather plays a crucial role in rocket ignition, as extreme temperatures and high humidity can disrupt the chemical and electrical processes required for a successful launch. Each environmental factor demands specific precautions to ensure motors perform as intended.
Cold temperatures, for example, can significantly reduce igniter sensitivity and motor efficiency, particularly in composite motors. To counteract this, research and experimental rocket motors must be carefully engineered to withstand extreme temperature variations, avoiding performance issues caused by the cold.
Humidity, on the other hand, is a frequent culprit behind igniter failures. As AC Supply Co highlights:
"Exposure to humidity can weaken an igniter's components, leading to failure during launch".
When igniters are exposed to moisture, their components degrade, preventing the pyrogen from reaching the ignition temperature needed to light the propellant. Even handling igniters with damp or oily hands can transfer contaminants, which interfere with electrical conductivity and increase the risk of failure.
Wind, while not directly affecting ignition, has a significant impact on flight stability. According to the UKRA Safety Code:
"At wind speeds exceeding 10mph the flier should choose the Rocket Motor carefully to ensure that stable flight is achieved before the Rocket leaves the Launch Rail".
For safety reasons, launches are strictly prohibited when wind speeds surpass 20mph.
Rainy weather introduces additional challenges. Both igniters and motors must remain completely dry during preparation to avoid complications. To ensure everything is ready for launch, always perform a final continuity test under the prevailing weather conditions. This step helps confirm that your electrical circuit is functioning correctly, even in less-than-ideal environmental circumstances.
4. Incorrect Motor Installation
Even the best motors and igniters can fail if they aren't installed correctly. One frequent issue is not seating the igniter properly. If the igniter doesn’t make good contact with the propellant, it might burn out without producing enough heat to ignite the motor. This can directly affect the motor's performance and is a common pitfall during installation.
Short circuits are another common problem. If the igniter wires are pinched during plug insertion, it can cause a short circuit, preventing proper heating. Similarly, issues can occur if the micro-clips touch each other, the metal blast deflector, or any part of the launch pad. As Charlie explains:
"A failed launch is usually because of electrical problems or igniter installation or connection."
Correctly securing the igniter is just as important. Skipping the use of the manufacturer-supplied plastic plug or tape might let the igniter shift or even fall out before ignition. When inserting the plug, press it down firmly with your thumb and bend the igniter wires into a U-shape to keep them securely in place.
Finally, avoid forcing components during installation. Pushing the igniter too hard into the nozzle or overtightening can damage the bridge wire or its coating. Handle all parts carefully, ensuring the igniter is properly seated against the propellant.
For a detailed step-by-step guide, refer to the instructions provided in your Rocketry for Schools kit (https://rocketryforschools.co.uk).
sbb-itb-f093e97
5. Expired or Damaged Rocket Motors
After assessing igniters, connections, and external conditions, it’s essential to evaluate the rocket motor itself.
Rocket motors have a limited shelf life, and their propellant is particularly sensitive. Over time, this material can degrade, which may alter the burn rate and lead to dangerous outcomes. Detecting any damage or signs of ageing in the motor is just as important as ensuring proper ignition to maintain launch safety.
Check for physical damage, especially if the motor has been dropped. Black Powder (BP) motors are especially fragile. Unlike composite motors, they lack flexibility and are more prone to cracking if subjected to impact. Wizard Rockets highlights the risks involved:
"Cracks inside the motor caused by impacts or freeze/thaw cycles will severely increase the chance of motor failure and should be considered dangerous".
Such cracks can significantly increase the burn surface area, which may result in catastrophic failure.
Beware of motors stored in damp or unstable temperature conditions. Exposure to moisture or fluctuating temperatures can degrade the propellant, causing unpredictable burn rates. For instance, motors left in damp sheds, stored in car boots during freezing winters, or subjected to extreme temperature changes are particularly vulnerable. The UKRA Safety Code advises:
"The Rocket must be inspected for condition, integrity and degradation due to storage, transport or age".
Always examine motors for cracks, dampness, or other signs of damage. If a motor has been dropped, frozen, or exposed to water, do not attempt to use it. Instead, dispose of it safely by soaking it in water. To minimise risks, store motors in dry, temperature-stable environments, but remember to inspect each motor thoroughly before every launch.
How to Prevent Motor Misfires
Avoiding motor misfires starts with thorough pre-launch checks and careful handling of your equipment. Begin by inspecting your igniters before every launch. Look for any damaged wires and either trim or straighten them to ensure a solid electrical connection. Avoid touching the conductive tips with your bare fingers - skin oils and dirt can interfere with conductivity, which could lead to a failed ignition. These small but essential steps can make a big difference in ensuring a smooth and successful launch.
Next, perform a continuity test. Connect the igniter to the launch controller and check for a beep or an indicator light. If the light doesn’t come on, try gently moving the safety key to clear any internal oxidation. Also, double-check that the controller’s batteries are in good working order - this is often an overlooked detail that can cause issues.
When setting up, make sure the igniter’s pyrogen tip is in direct contact with the propellant. Secure it using the provided plug or tape, and shape the wire leads into a "U" for added stability. Ensure the clips are clean and positioned so they don’t touch each other, the blast deflector, or the launch rod. Even a small oversight here can disrupt the entire launch.
Proper storage is just as important for maintaining your equipment. Keep rocket motors in wooden boxes stored in a dry, temperature-controlled space. Igniters should be kept in airtight containers in a cool, dry environment to protect them from moisture and humidity. High-quality equipment - like the igniters, motors, and controllers offered by Rocketry for Schools - can also help reduce the risk of misfires and improve reliability.
If the igniter burns but the motor doesn’t ignite, it’s likely the igniter wasn’t making proper contact with the propellant. On the other hand, if the igniter doesn’t burn at all, it probably didn’t receive enough electrical current. Recognising these signs can help you quickly identify the problem and fine-tune your preparation process for future launches.
Conclusion
Motor misfires can throw a wrench in your launch plans, but the good news is - they’re avoidable. The five main culprits we’ve discussed - faulty igniters, poor electrical connections, external conditions, incorrect motor installation, and expired motors - cover most ignition failures. As Charlie from The Model Rocket explains:
"In order for a rocket to launch, there needs to be adequate electricity that lights the igniter that then ignites the engine, so diagnose the problem in that order".
To prevent misfires, tackle potential issues step by step. Reviewing each component methodically ensures you’re fully prepared for a smooth launch.
Preparation is everything. Use reliable, high-quality equipment to minimise risks - strong components like centring rings enhance structural integrity, while proper motor storage in a dry, temperature-controlled space keeps them in top condition. Storing igniters in airtight containers protects them from moisture, and pre-launch continuity tests paired with clean connections add an extra layer of reliability. By addressing these factors, you set yourself up for safe and consistent flights.
For dependable supplies, check out Rocketry for Schools. They provide everything from durable igniters and motors to complete starter kits, giving you the tools you need for successful launches every time.
FAQs
How can I stop moisture from affecting my rocket igniters?
Moisture can cause serious issues with rocket igniters, including misfires. To help prevent this, make sure to store igniters in dry, airtight containers. Keep them in a cool, stable place where humidity won’t be a problem. Adding silica gel packets to the storage containers is a smart way to absorb any extra moisture.
When it’s time to launch, try to keep igniters away from damp conditions. If the weather is humid or rainy, you might want to delay the launch or use protective coverings to keep the igniters dry until they’re ready to go. Taking these precautions can greatly reduce the chances of moisture-related problems.
How can I tell if a rocket motor is expired or damaged?
Common indicators that a rocket motor might be expired or damaged include a burnt or absent starter tip, a starter that doesn’t ignite or lacks continuity, or physical issues like cracks, corrosion, or signs of moisture on the motor casing. It’s crucial to carefully inspect the motor before use to ensure a safe and successful launch.
For your rocketry projects, it’s worth sourcing motors and supplies from trusted providers like Rocketry for Schools. They specialise in offering high-quality equipment tailored for hobbyists and educational teams.
Why should you perform a continuity test before launching a rocket?
Before launching, carrying out a continuity test is a must to confirm that the igniter circuit is intact and working as it should. This simple step can pinpoint problems like weak connections or short circuits, which helps minimise the chances of misfires and ensures the ignition process goes smoothly.
By verifying the circuit's readiness, you can sidestep potential delays or safety risks during the launch. It's a crucial part of preparing for any rocket launch.