
Lightweight GPS Datalogger for School Rockets
If I want a GPS datalogger for a school rocket, I keep it small, light, and easy to download after landing. For most school flights, that means a unit that fits a 24 mm or 29 mm airframe, logs at 10–20 Hz, runs from a 3.7 V LiPo for 30–60 minutes on the pad plus flight time, and stores data in CSV so students can open it straight away in Excel or Python.
Here’s the short version:
- I use onboard logging when I want less setup than live tracking
- I count battery, wiring, and mount in the payload mass, not just the board
- I keep boards to 18 mm wide or less for 24 mm tubes, and up to 26.3 mm for 29 mm tubes
- I start with a 400 mAh LiPo, with 900 mAh as another option if I want more runtime
- I avoid loose headers and use JST plugs or soldered leads, because launch loads can reach 68 G
- I pick microSD for easy file transfer or onboard flash for lower mass and better shock handling
- I save files with a clear UK-style name such as
FLIGHT_060826_1430.csv - I mount the logger on a sled, pad it lightly, and keep it away from ejection mess
- I place the antenna under plastic or fibreglass, not carbon fibre
- I do field checks for GPS lock, battery, free memory, and a test log
- I wait for the logger to finish saving before I switch it off after landing
The main point is simple: a school rocket GPS logger should be light enough not to upset the rocket, tough enough to stay connected under load, and simple enough for students to use on launch day.
This article boils that down into the key choices: logging vs telemetry, size, battery, memory, mounting, antenna position, and safe data retrieval.
Arduino Data Logger for Estes Rocket w/Plotted Altitude in Python

sbb-itb-f093e97
Choose the right logger: mass, power and memory first
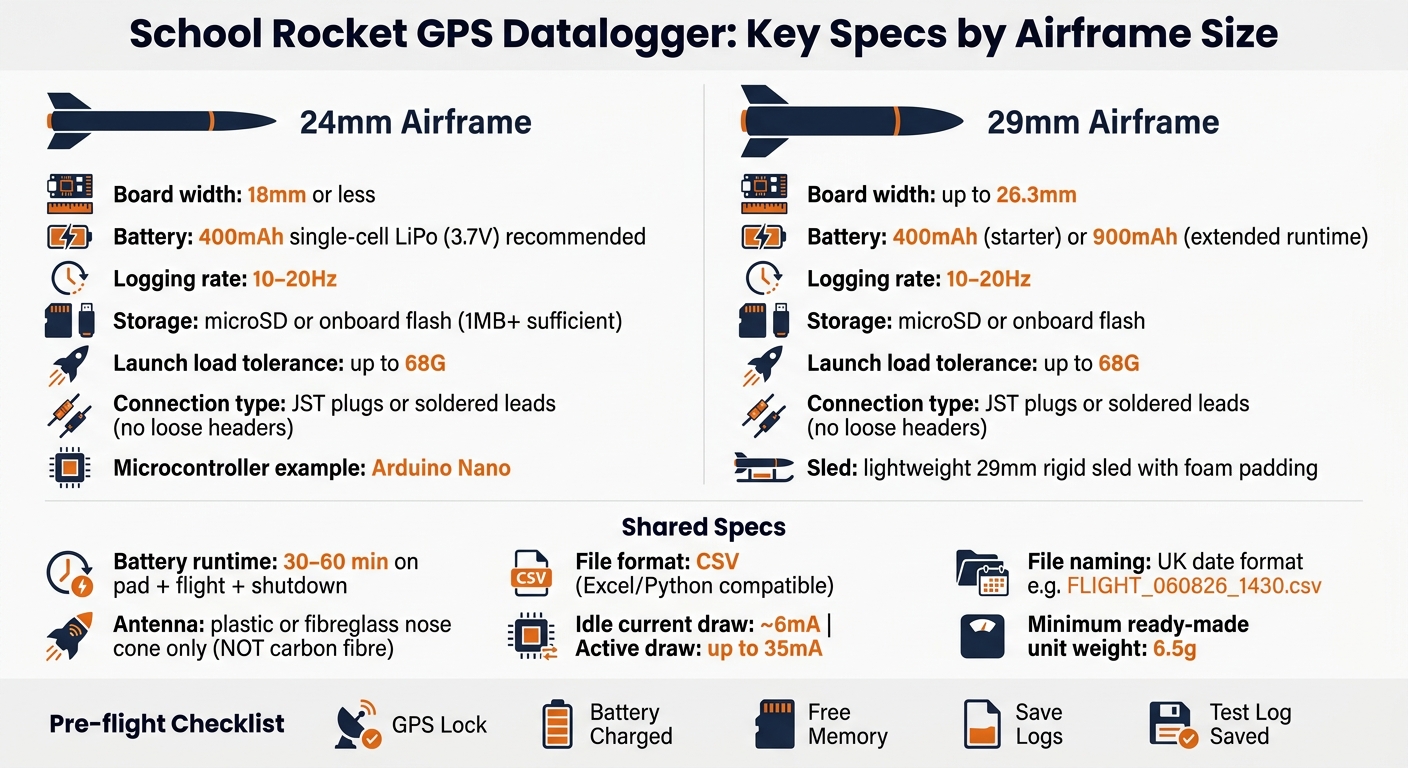
School Rocket GPS Datalogger: 24mm vs 29mm Airframe Specs at a Glance
Set a realistic mass budget for small airframes
Treat the logger as more than just the board. You need to count the battery, mount and wiring as part of the payload mass too. On small airframes, the margin is tight, and every gram affects stability, recovery and motor choice.
For a 24 mm airframe, keep the board at 18 mm wide or less so there’s still space for padding and the unit can slide into the tube cleanly. A 29 mm airframe gives you a bit more breathing room. Boards up to 26.3 mm wide can fit, with enough clearance for wiring and fixing points.
Once you’ve fixed the mass budget, the next step is simple: make sure the battery can last for the whole launch-day timeline.
Match battery capacity to pad wait, flight and shutdown time
Plan for 30 to 60 minutes on the pad, then add flight time and shutdown time. The battery also needs enough reserve to save the log properly after touchdown. That last part matters. A flight file that doesn’t save is no use to anyone.
A 400 mAh single-cell LiPo (3.7 V) is a solid starting point. Typical current draw is about 6 mA when idle and up to 35 mA during active tasks such as LED signalling. If you want more headroom, a 900 mAh LiPo also sits within the recommended range.
For connections, use JST plugs or soldered leads. Loose pin headers are asking for trouble. Under launch loads of up to 68 G in high-performance kits, they can shake free.
After power, the next constraint is storage: how the logger records the flight and how fast students can get the data off it.
Pick memory and logging settings that suit school use
A 10–20 Hz logging rate gives good resolution for short model rocket flights. That’s usually enough detail without making file handling a pain.
The main choice is the storage type:
- microSD is easiest for file transfer
- Onboard flash is lighter and stands up better to shock
In school use, the best option is often the one students can recover and open quickly on launch day.
Save logs as CSV so students can open them in Excel or Python without any conversion step. Name files using UK date and time format. For example: FLIGHT_060826_1430.csv. It’s also worth setting the logger’s internal clock to GMT or BST before launch day, so the timestamps line up with the written log.
Once the logger choice is fixed, mount it so it stays secure without upsetting balance or recovery.
Build or buy a lightweight GPS datalogger
What to look for in a ready-made unit
For 24 mm to 29 mm tubes, go for hardware that stays small and light. The full unit needs to fit inside your mass budget, not just look tiny on a spec sheet. Some purpose-built units weigh as little as 6.5 g and come with 1 MB of onboard flash, which is enough for short school flights.
Size isn't the only thing that matters. Clear status feedback makes life much easier at the field. Look for LEDs or buzzer alerts that show power, GPS lock and active logging. That way, students can check the unit is working before launch instead of guessing.
Built-in micro-USB or USB-C is also a big plus. After recovery, students can plug the logger straight into a laptop without hunting down extra kit or odd cables.
"Built-in Micro USB port allows you to connect directly to your computer without using a special data transfer kit." - LOC Precision
Once you've ticked off mass and power, the next job is simple: make sure the unit is easy to mount and easy to access.
Simple parts for a DIY logger
A basic DIY logger doesn't need a huge parts list. In most cases, you'll want:
- A GPS module with a ceramic patch antenna (UART)
- A microcontroller such as an Arduino Nano or ESP32
- A storage option such as a micro SD card module via SPI or onboard flash
- A single-cell LiPo battery
An Arduino Nano works well in narrow 24 mm airframes because it fits without too much fuss.
When you wire it up, skip loose pin headers if you can. Soldered connections or JST plugs are a safer bet, since launch forces can shake headers loose. Hold the battery in place with hook-and-loop tape, and mount the parts on a laser-cut or 3D-printed sled so everything stays centred inside the tube. Add a status LED too. It should show power, GPS lock and logging at a glance.
Pre-flight checklist for either route
Do these checks at the launch site, not the night before at home. A logger that looked fine on your desk can still fail in the field.
- GPS lock - confirm a solid satellite fix away from buildings and metal structures
- Battery charge - make sure it's fully charged and the connector is secure
- Free memory - clear old logs before the flight
- Test log - run a short test and check that it saves cleanly
For DIY builds, set the barometric baseline at the launch site.
If all of that checks out, the logger is ready to go into the airframe.
Install the logger without affecting flight or recovery
Secure mounting in 24 mm to 29 mm payload spaces
Once you've tested the logger, the next job is simple: mount it so it stays put during flight and recovery.
Start with a rigid sled. That gives you a firm, repeatable mounting point instead of leaving the logger to rattle around inside the airframe. Lightweight sleds made for 29 mm airframes work well, and a little foam padding can help cut vibration reaching the logger.
If the logger goes in the nose section, keep it in a separate payload bay or a plastic nose cone. That helps keep it away from ejection residue, which can make a mess of electronics in no time.
Antenna placement and logger access
After the unit is fixed in place, make sure the antenna has a clear view of the sky. Plastic and fibreglass nose cones are good choices because they don't block RF signals. Carbon fibre is a different story and can block reception, so don't place the antenna inside a carbon fibre section.
Mount the logger so the antenna points upward towards the tip of the nose cone, not sideways and not towards the motor end. If you're using a board with an integrated patch antenna, keep the copper ground plane clear from the area directly beneath it. If you don't, signal quality can drop.
It also helps to think ahead about access. Place the USB port or power switch near a small cutout or window in the payload section. That way, students can arm the logger, check the status LED, and pull the data after landing without taking half the rocket apart. Devices with built-in micro-USB ports make file retrieval easy.
Recover the flight data safely after landing
Safe shutdown and file retrieval
After landing, use the access point you planned during installation to shut the logger down cleanly. Don't switch it off the moment you get your hands on it.
First, check the status LED to see whether the logger is still recording or whether it has finished and closed the data file. If you cut the power too soon, you could corrupt the file. Wait until the LED shows a closed or idle state before you touch the power switch or disconnect the battery.
Turn logs into usable flight results
Once the file is saved, you can turn the raw data into flight results.
Open the file in Excel or Python, then look for motor burnout, peak altitude and landing point. If the data drops out, check that the microSD card is fully seated, and tape the slot before launch.
For school launches, keep retrieval as simple as the logger allows. For school use, direct USB download is the easiest option. Remove the microSD card only if the logger doesn't have a data port.
Conclusion: keep it light, simple and recoverable
Keep it light, simple and easy to recover.
FAQs
How much should a rocket GPS logger weigh?
For educational model rockets, keep the GPS datalogger as light as you can. Extra mass can hurt flight performance, especially on smaller builds. Some dedicated tracking boards weigh as little as 6.5 g or 12.3 g.
A good rule of thumb is to stay under 20 g in total, including the battery and mounting. That usually makes it much easier to fit inside small airframes and helps you stay within your rocket’s lift capacity.
Is microSD or onboard flash better?
For educational model rocketry, microSD is often the better option, especially for custom flight computers. It’s reliable, affordable, and easy to pull out when you want to move flight data to a computer.
Some small, professional-grade designs use onboard flash instead. But for student projects, microSD is usually the more practical pick.
A couple of details matter here:
- Make sure the card is seated properly
- Format it to FAT32 for steady performance
Where should I place the GPS antenna?
Mount the antenna in the rocket’s payload bay where it has the clearest possible view of the sky. Keep it away from metal parts, because metal can weaken the signal.
If the hardware is small, hold it in place with foam padding so it stays protected during launch and ejection. Do ground tests before flight to check signal reception inside your airframe.